There are a few things you’ll need to do in order to properly disassemble a bolt carrier group.
1. Make sure the firearm is unloaded and pointed in a safe direction.
2. Remove the magazine and verify that there is no ammunition in the chamber.
3. Using a punch or Allen wrench, remove the c-clip that retains the firing pin retaining pin.
4. Rotate the bolt carrier group 90 degrees so that the cam pin hole is facing up and gently drive out the cam pin with a punch or Allen wrench.
5. Gently pull on the bolt carrier group and remove it from the upper receiver.
6. Push out the firing pin retaining pin and remove the firing pin and bolt carrier key.
7. Remove the gas key by unscrewing it with an Allen wrench.
8. Unscrew the bolt from the bolt carrier group.
9. The last step is to remove the extractor and firing pin from the bolt. To do this, first remove the retaining pin using a punch or Allen wrench. Then, push out the firing pin and extractor from the other side of the bolt.
You’ve now successfully disassembled your bolt carrier group!
There are a few things you need to know before you start disassembling a bolt carrier group (BCG).
First, make sure the gun is unloaded and that there is no ammunition in the chamber or magazine.
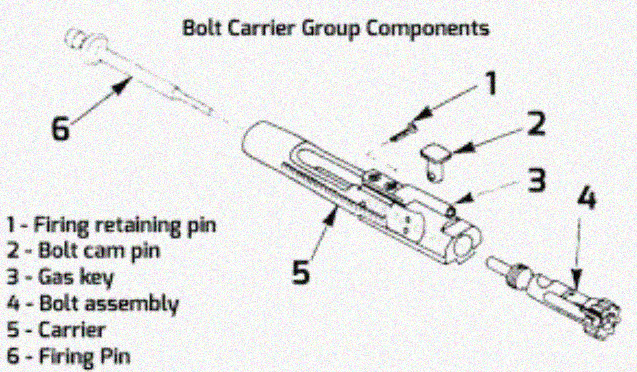
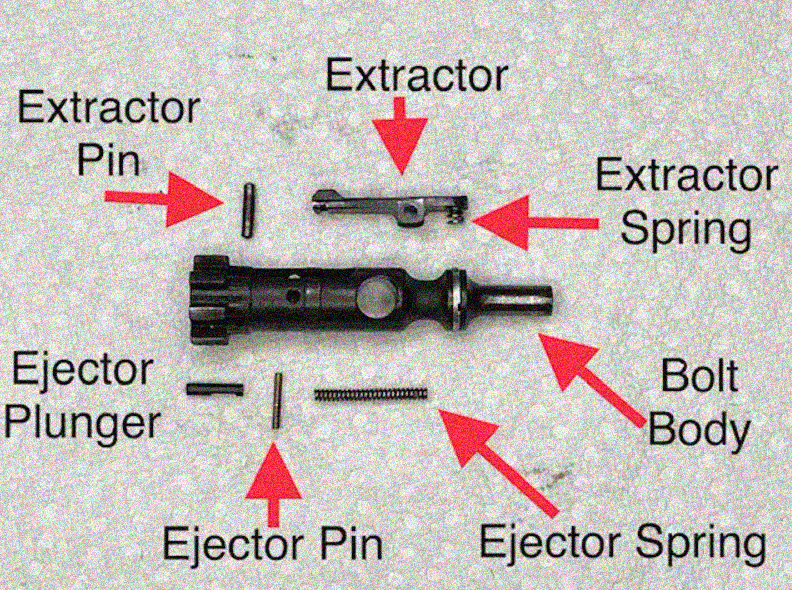
Second, be familiar with the parts of a BCG.
You’ll need a punch (or something similar) to drive out the pins, and a hammer to strike the punch. The process is pretty simple:
1. Drive out the firing pin retaining pin from the rear of the bolt carrier. Be careful not to lose it!
2. Remove the firing pin and spring from the bolt carrier.
3. Drive out the extractor pin from the front of the bolt carrier.
4. Remove the extractor and spring from the bolt carrier.
5. That’s it! You’ve now disassembled the bolt carrier group.
Now that you know how to take apart a BCG, here are a few tips on cleaning and lubricating it:
1. Use a good quality solvent to clean all the parts, including the inside of the bolt carrier. Make sure to remove all the old grease and oil from the parts.
2. Inspect all the parts for wear or damage. Replace any damaged or worn parts.
3. Apply a light coat of oil to all the parts, including the inside of the bolt carrier. Wipe off any excess oil.
4. Reassemble the bolt carrier group. Make sure all the parts are properly installed and that the pins are securely in place.
5. Test the BCG to make sure it’s functioning properly. Dry fire the gun a few times to make sure the firing pin is striking the primer correctly and that the extractor is working properly.
That’s it! You now know how to clean and lubricate a bolt carrier group.
There are a few things you’ll need to have on hand before you can take apart your bolt carrier group:
- Gun oil or lubricant
- A bench vise
- Allen wrench set
- Cleaning brush
- Patience
Once you have everything you need, follow these steps to disassemble your bolt carrier group:
1. Lubricate the bolt carrier and inside of the charging handle with gun oil. This will help keep everything well-lubricated as you disassemble it.
2. Place the Bolt Carrier Group in a bench vise with the rear end facing up. If possible, use a vise that has soft jaws so as not to damage the finish on your bolt carrier group.
3. Use an Allen wrench to remove the two screws that hold the charging handle in place.
4. Remove the charging handle from the bolt carrier group.
5. Use an Allen wrench to remove the gas key from the top of the bolt carrier group.
6.Remove the bolt from the bolt carrier group by depressing the firing pin and turning it counter-clockwise until it comes out.
7. Use a cleaning brush to clean any dirt or debris from all of the parts.
8. Reassemble everything in the reverse order, being sure to lubricate all of the parts as you go.
With a little time and patience, you can easily disassemble and clean your bolt carrier group. Just be sure to follow the steps carefully and have all of the necessary tools on hand before you begin.
There are a few things you’ll need to gather before beginning the disassembly process:
- A Torx T-15 wrench
- A small punch or nail
- Needle nose pliers
- Flathead screwdriver
Once you have all of your tools gathered, it’s time to get started. First, use the Torx T-15 wrench to remove the firing pin retaining pin. Be very careful not to lose this tiny piece, as it’s essential for reassembly. Next, use the punch or nail to knock out the firing pin retaining spring. Again, take care not to lose this small part. Now you can use the needle nose pliers to remove the bolt carrier key from the bolt carrier.
With the bolt carrier key removed, you can now pull the charging handle to the rear and remove the bolt carrier group from the upper receiver. At this point, you can begin cleaning all of the parts. Once everything is clean and dry, you can start reassembling your AR-15. Begin by inserting the bolt into the bolt carrier. Make sure that the gas key is properly aligned with the gas tube before continuing. Next, insert the firing pin into the bolt carrier and secure it with the retaining pin. Finally, replace the charging handle and you’re done!
First remove the firing pin by unscrewing the firing pin retaining screw. Then separate the bolt from the carrier by pushing down on the cam pin and pulling outwards on the bolt. The extractor and ejector should come with the bolt. Next remove the gas rings by pushing them off of the gas tube onto a hard surface. Finally remove the barrel nut and handguard by loosening the set screws and sliding them off.
With the basic understanding of how a bolt carrier group works and its individual parts, you can see why it is such an important piece of your firearm. It not only houses the firing mechanism, but also plays a vital role in the cycling of your gun. Be sure to keep it clean and well lubricated to ensure smooth operation and longevity.
There are a few main steps you need to take in order to properly disassemble a bolt carrier group (BCG). The first is to remove the firing pin. To do this, you’ll need to use a punch or another object that can fit into the hole at the rear of the firing pin. Gently tap it out until it pops out.
Next, you’ll need to remove the retaining clip that holds the BCG together. This can be done with a pair of pliers or by using your fingers to pry it open. Once it’s open, you can slide the bolt and carrier out from the back end.
The final step is to remove the gas rings from around the carrier.
Please login or Register to submit your answer