To assemble an AR upper, you will need a few key tools:
- Barrel nut wrench
- A torque wrench
- Allen wrenches
- Thread locker
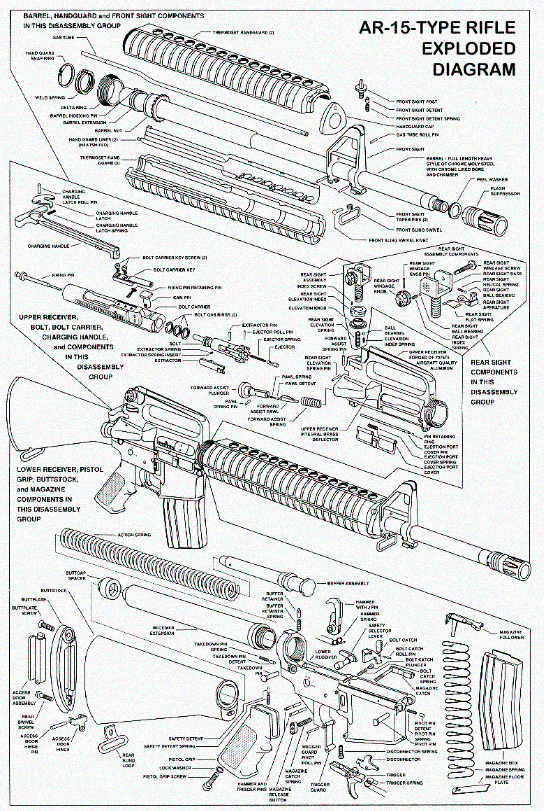
Step 1. To start, remove the handguard from the old upper receiver and set it aside. Next, install the barrel into the upper receiver and secure it using the barrel nut. The barrel nut should be torqued to between 30 and 80 ft/lbs. using a torque wrench. Then, install the delta ring and snap ring if applicable.
Step 2. Once that is done, you can begin installing the forward assist and dust cover. The forward assist is installed by threading it onto the threaded hole on the upper receiver until it is tight. The dust cover is installed by inserting the spring into the groove on the upper receiver and then snapping on the dust cover.
Step 3. After the forward assist and dust cover are installed, you can install the handguard. First, determine which type of handguard you will be using (free float or drop-in). Then, follow the instructions that come with the handguard to install it.
Step 4. Finally, you will need to install the charging handle and bolt, carrier group. The charging handle can be installed by simply inserting it into the upper receiver and then locking it in place with the latch. The bolt carrier group is installed by first inserting the bolt into the carrier and then sliding it into the upper receiver. Make sure that the bolt carrier group is properly seated and then rotate the charging handle to the locked position.
We also recommend watching this video:
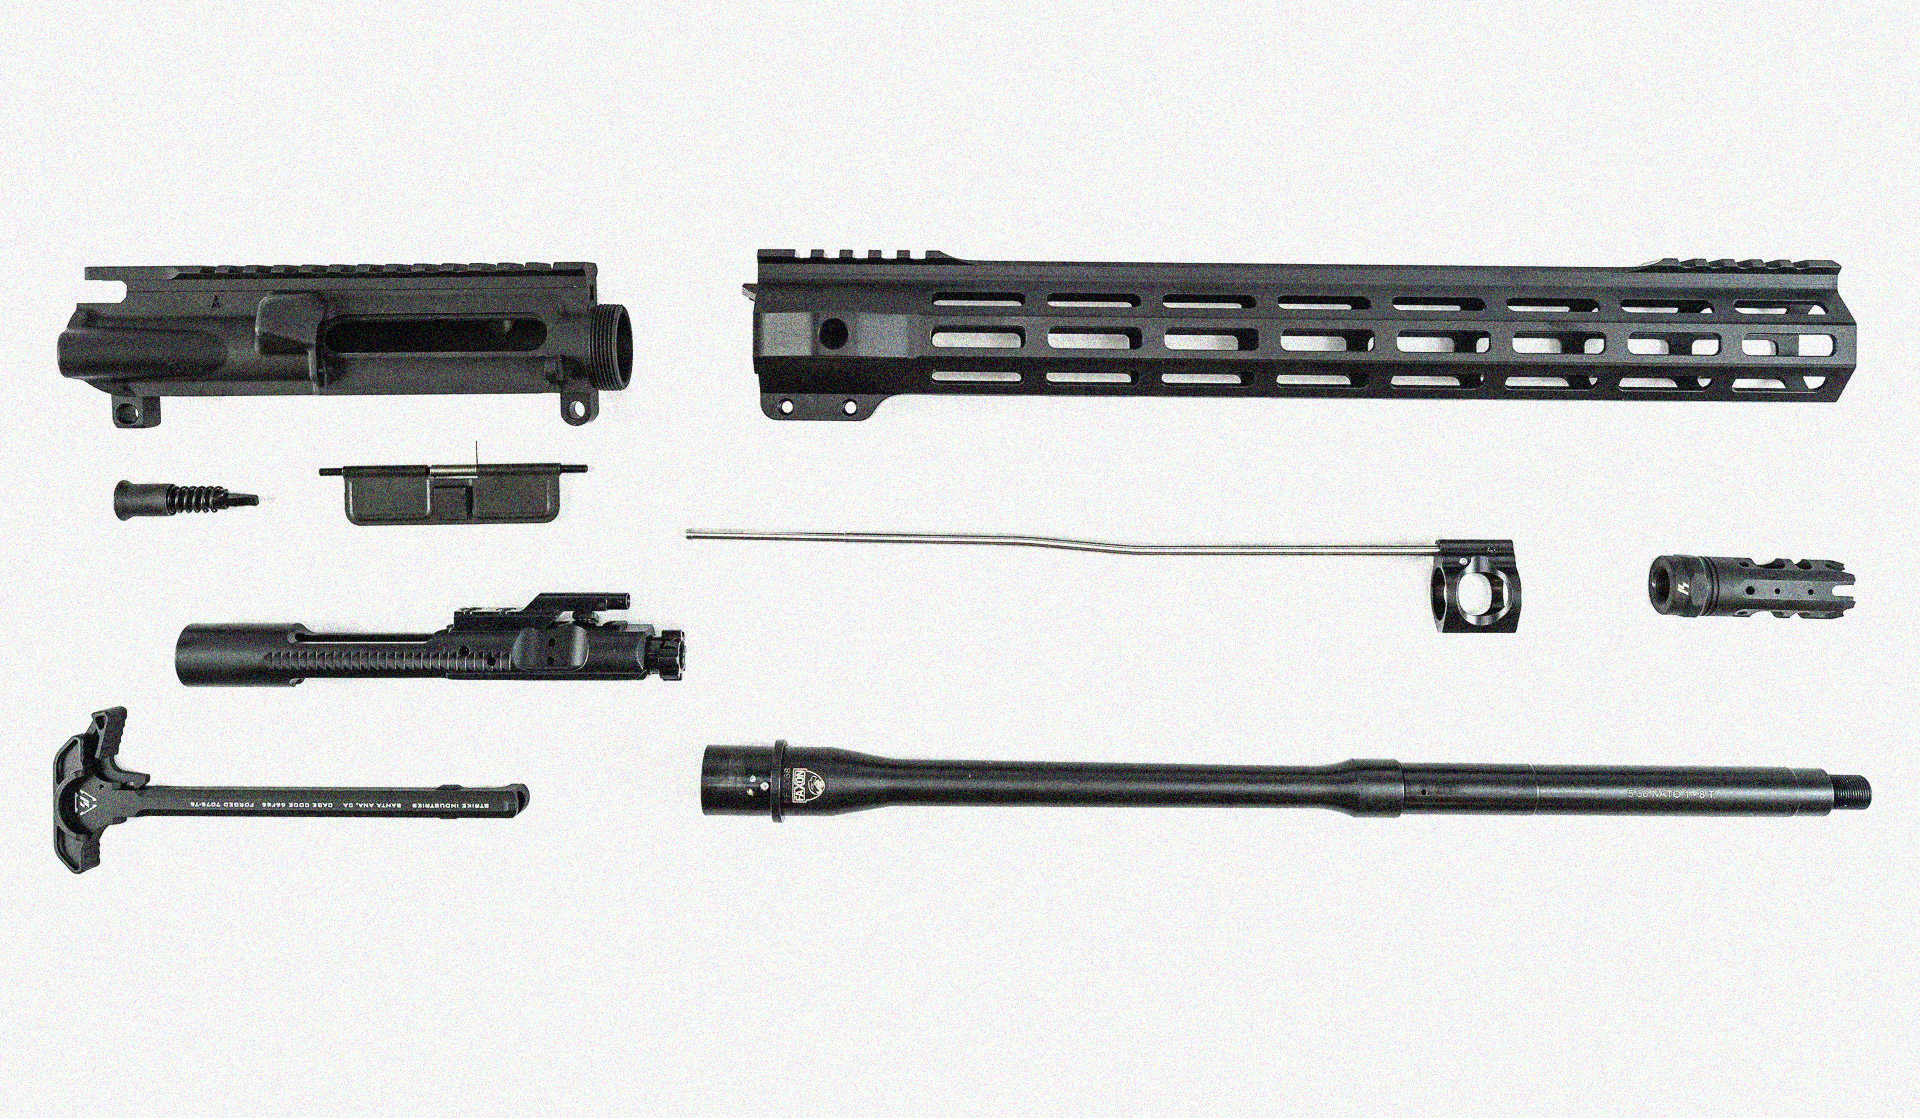
- An upper receiver
- A barrel nut
- A handguard or rail system
- Barrel extension
- Bolt carrier group
- Charging handle
- Gas tube
- Front sight base (if your barrel doesn’t have one already)
- Delta ring assembly
- To assemble the upper receiver, start by installing the barrel nut on the barrel. You may need to use a wrench to do this.
- Next, install the handguard or rail system on top of the barrel nut. The handguard or rail system will have a series of screws that secure it in place.
- Install the barrel extension on top of the handguard or rail system. The barrel extension will have a set screw that secures it in place.
- Finally, install the bolt carrier group and charging handle into the upper receiver. The bolt carrier group will have a series of pins that hold it in place. The charging handle will also have a set screw that secures it in place.
There isn’t a one-size-fits-all answer to this question, as the best way to assemble an AR upper will vary depending on the specific rifle and components you are using.
However, a few general tips on how to assemble an AR upper can be found below.
1. Start by installing the barrel into the barrel nut. Make sure that the barrel is properly aligned with the receiver before tightening it down.
2. Install the forward assist and dust cover onto the receiver.
3. Next, install the charging handle onto the upper receiver. MAKE SURE THAT THE CHARGING HANDLE IS FULLY SEATED BEFORE TIGHTENING IT DOWN!
4. Install the bolt carrier group (BCG) into the receiver. Make sure that the BCG is properly seated and locked into place before continuing.
5. Install the handguard of your choice onto the upper receiver. There are a variety of handguards available on the market, so make sure to choose one that fits your needs.
6. Finally, install the sights or optics of your choice.
With these tips in mind, assembling an AR upper receiver should be a relatively easy task. However, if you ever have any doubts or questions along the way, make sure to consult a qualified gunsmith or armorer for assistance.
We also recommend watching a video on how to assemble the upper part of the AR-15:
1. Start by removing the barrel from the receiver. This can be done by unscrewing it or by pulling it out of the receiver if it’s pinned in place.
2. Install the gas block and tube on the barrel. The gas block goes at the front of the barrel and the tube goes towards the rear. There should be a small hole drilled in the gas block for the passage of gas from the barrel to the tube. Make sure these are properly aligned before moving on.
3. Install the handguard retaining ring onto the barrel. This ring will keep the handguard in place and should be screwed on tight.
4. Now you can install the handguard onto the barrel. Make sure that it is seated properly against the gas block and that the retaining ring is in place.
5. Reattach the barrel to the receiver. Once again, make sure that everything is properly aligned before doing so.
With these simple steps, you’ll have your AR-15 upper ready to go in no time. Remember, always double-check your work and make sure that all parts are properly installed before firing your weapon.
Please login or Register to submit your answer